
Using Formie to create forms on Craft CMS websites
 By Gavin, 28 Jul 2022
Forms! Nearly every website requires forms for something – whether it’s lead capture, feedback surveys, newsletter signups, or booking requests.
At Good Work, our go-to option for forms on Craft websites is Formie. It allows you to build pretty much any form you could need, without resorting to another third-party subscription service.
Why we love Formie
- Easy-to-use: The drag and drop form builder has 30+ fields to choose from. Fields range from basic (like name, email address, and checkbox) to fancy (like predictive address lookup and Stripe-powered payment details).
- Email notifications: You can configure multiple notifications per form, e.g. sending the submission to your email address and emailing the submitter to confirm receipt. It’s easy to include data from the form in the notifications, and you can also set up conditional rules to determine when and how notifications should be sent. (Note: This does require using an email delivery tool that's usually $10/mo. or less.)
- Totally bespoke styling: You aren’t tied to any awkward third-party styles. While Formie has great out-of-the-box, time-saving templates, forms can be customized to be cohesive with your brand.
- Integrations: Chances are Formie offers an integration for your email marketing or CRM tool. Mailchimp, Constant Contact, Klaviyo, Pipedrive, Zoho, and dozens more are all supported. Formie also offers webhooks, so you can easily integrate with Zapier.
- Solid spam protection: Formie takes the protection of your forms from spam and bot attacks seriously.
Quick guide to creating a new form in Formie
1. Create the form
Log in to Craft and click Formie in the sidebar, then New Form in the top right. Give your form a name. This is when you could also choose a stencil * but we’ll start with a blank form and click Next. Now you’ll see the form screen. There are tabs along the top which we’ll walk through below. The first tab, Fields, is where most of the action is.
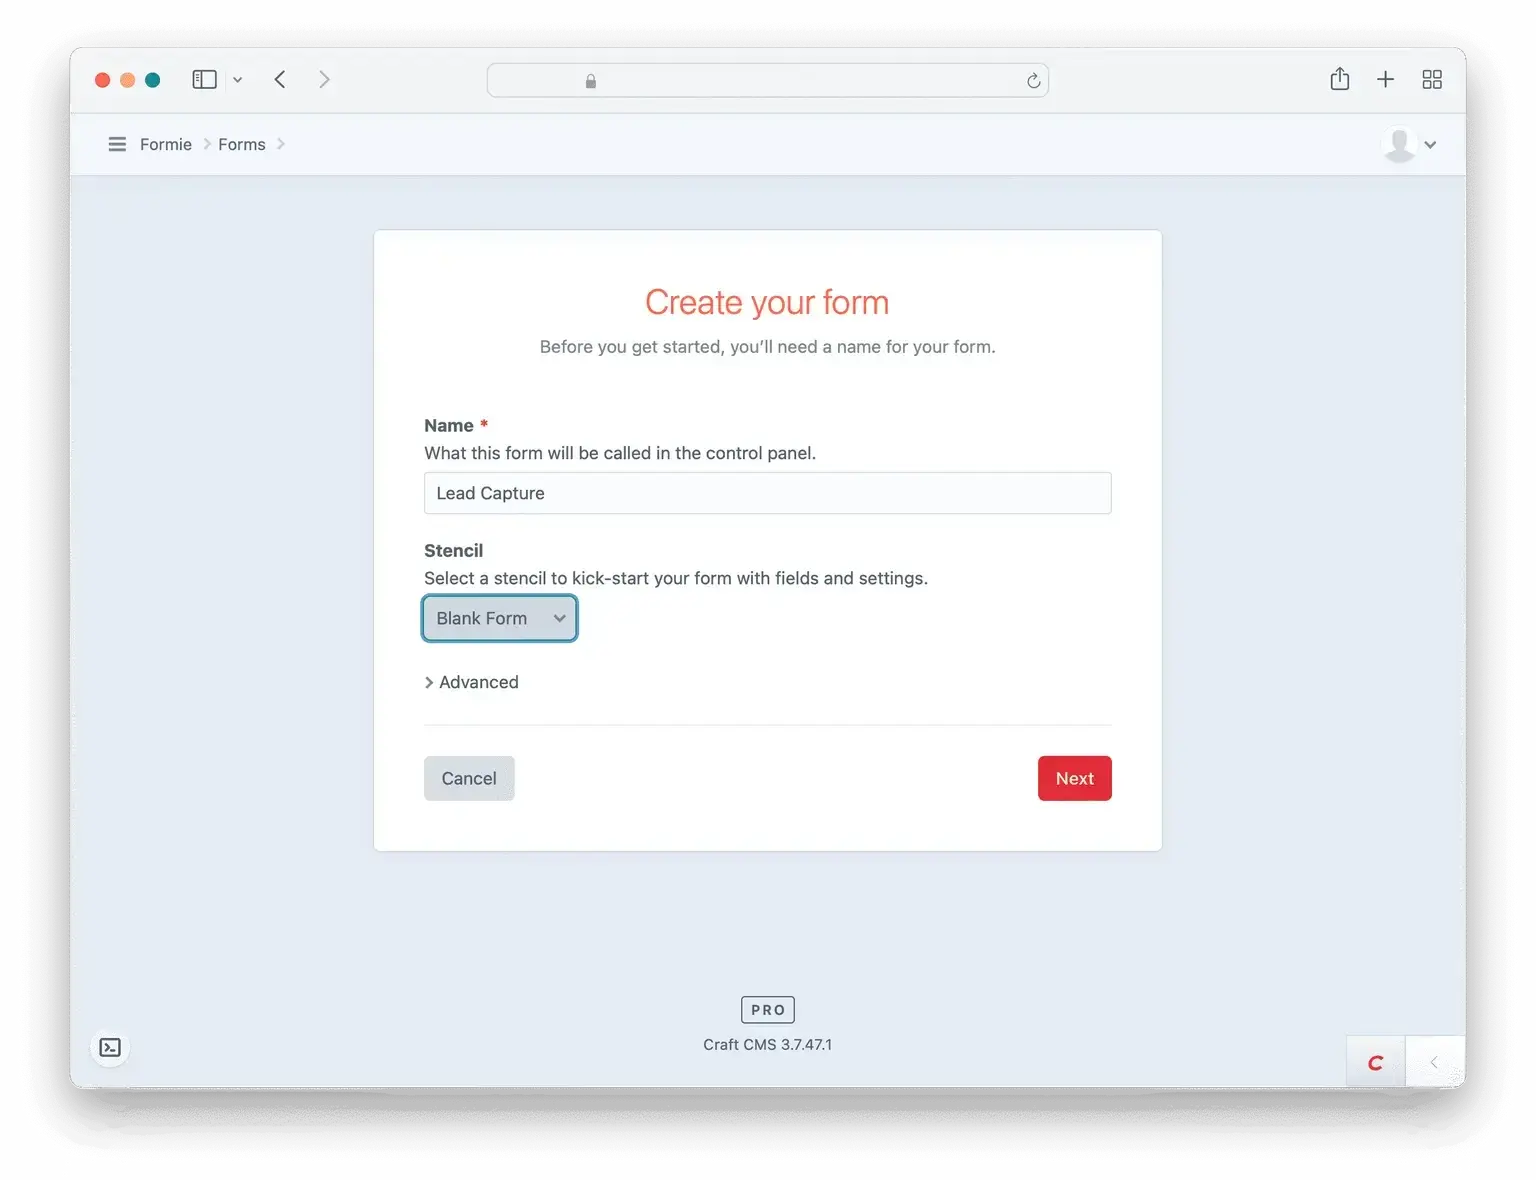
*Note: Stencils are form templates with fields and behavior already set up. If you regularly create similar forms, your web team can set up stencils for you – which can be used exactly as they are or with some small changes made before publishing the form.
2. Add form fields
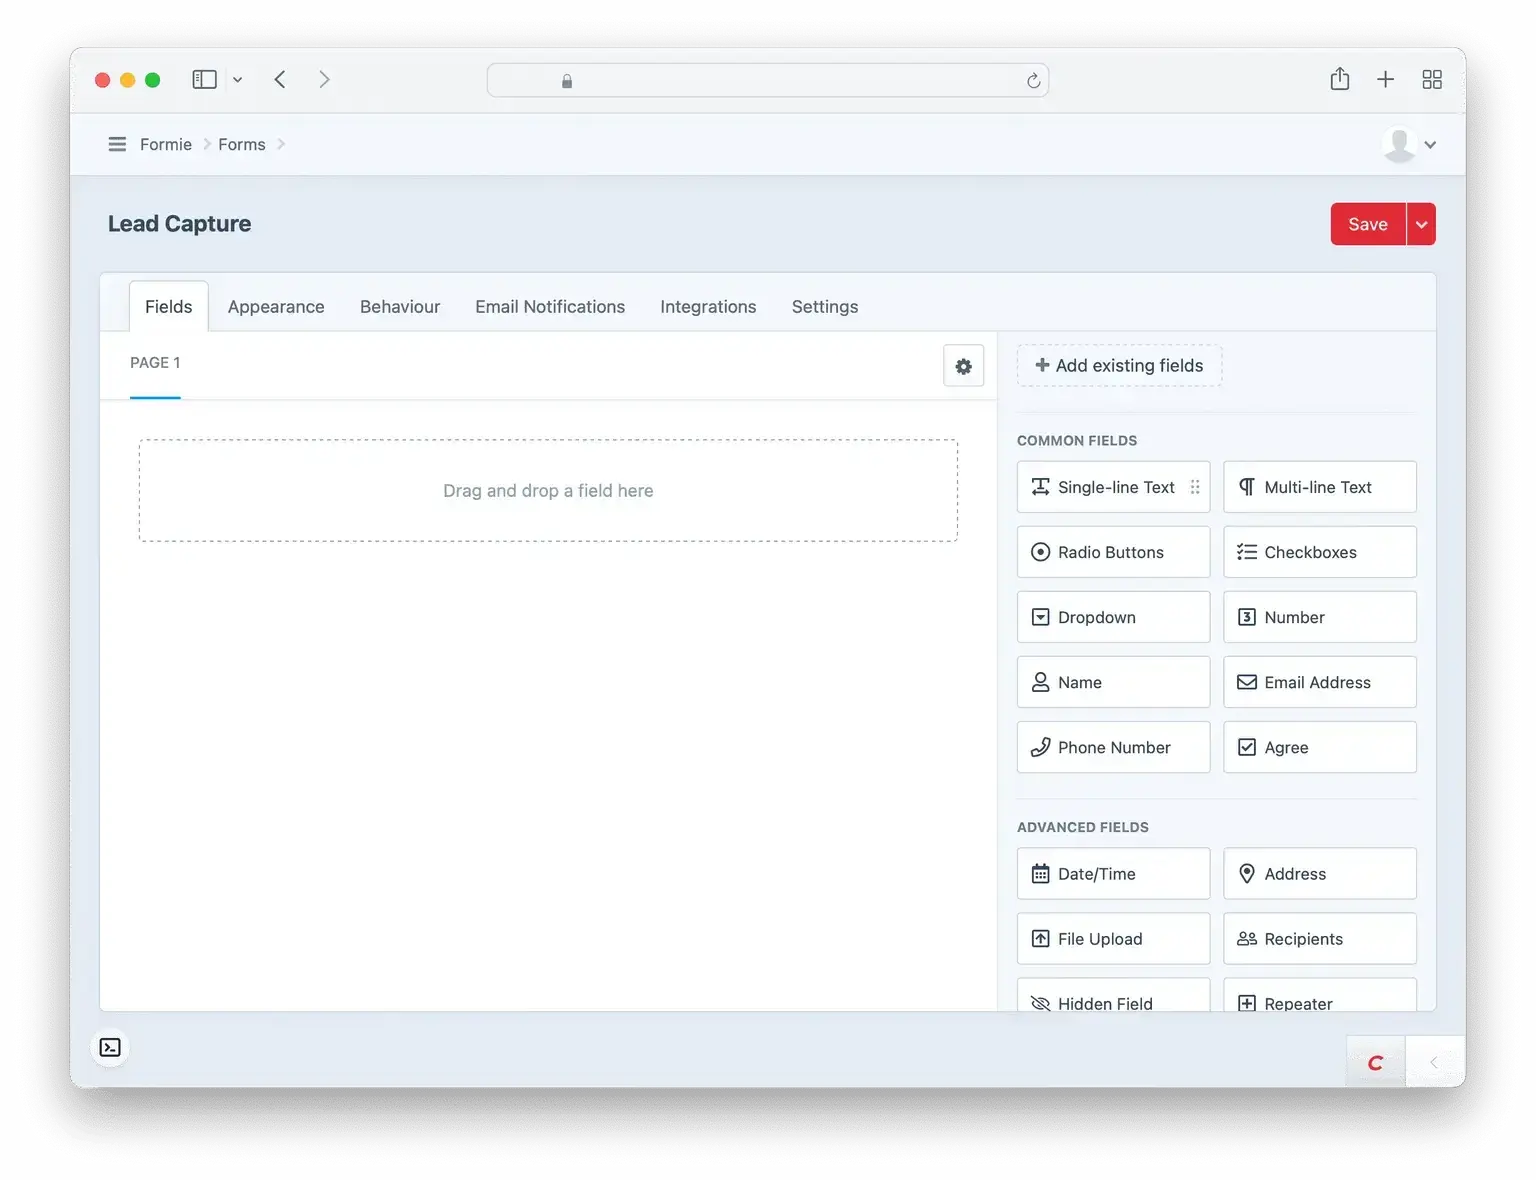
The Fields tab is where you’ll build out your form. Drag and drop a field from the list on the right into the “form area” on the left.
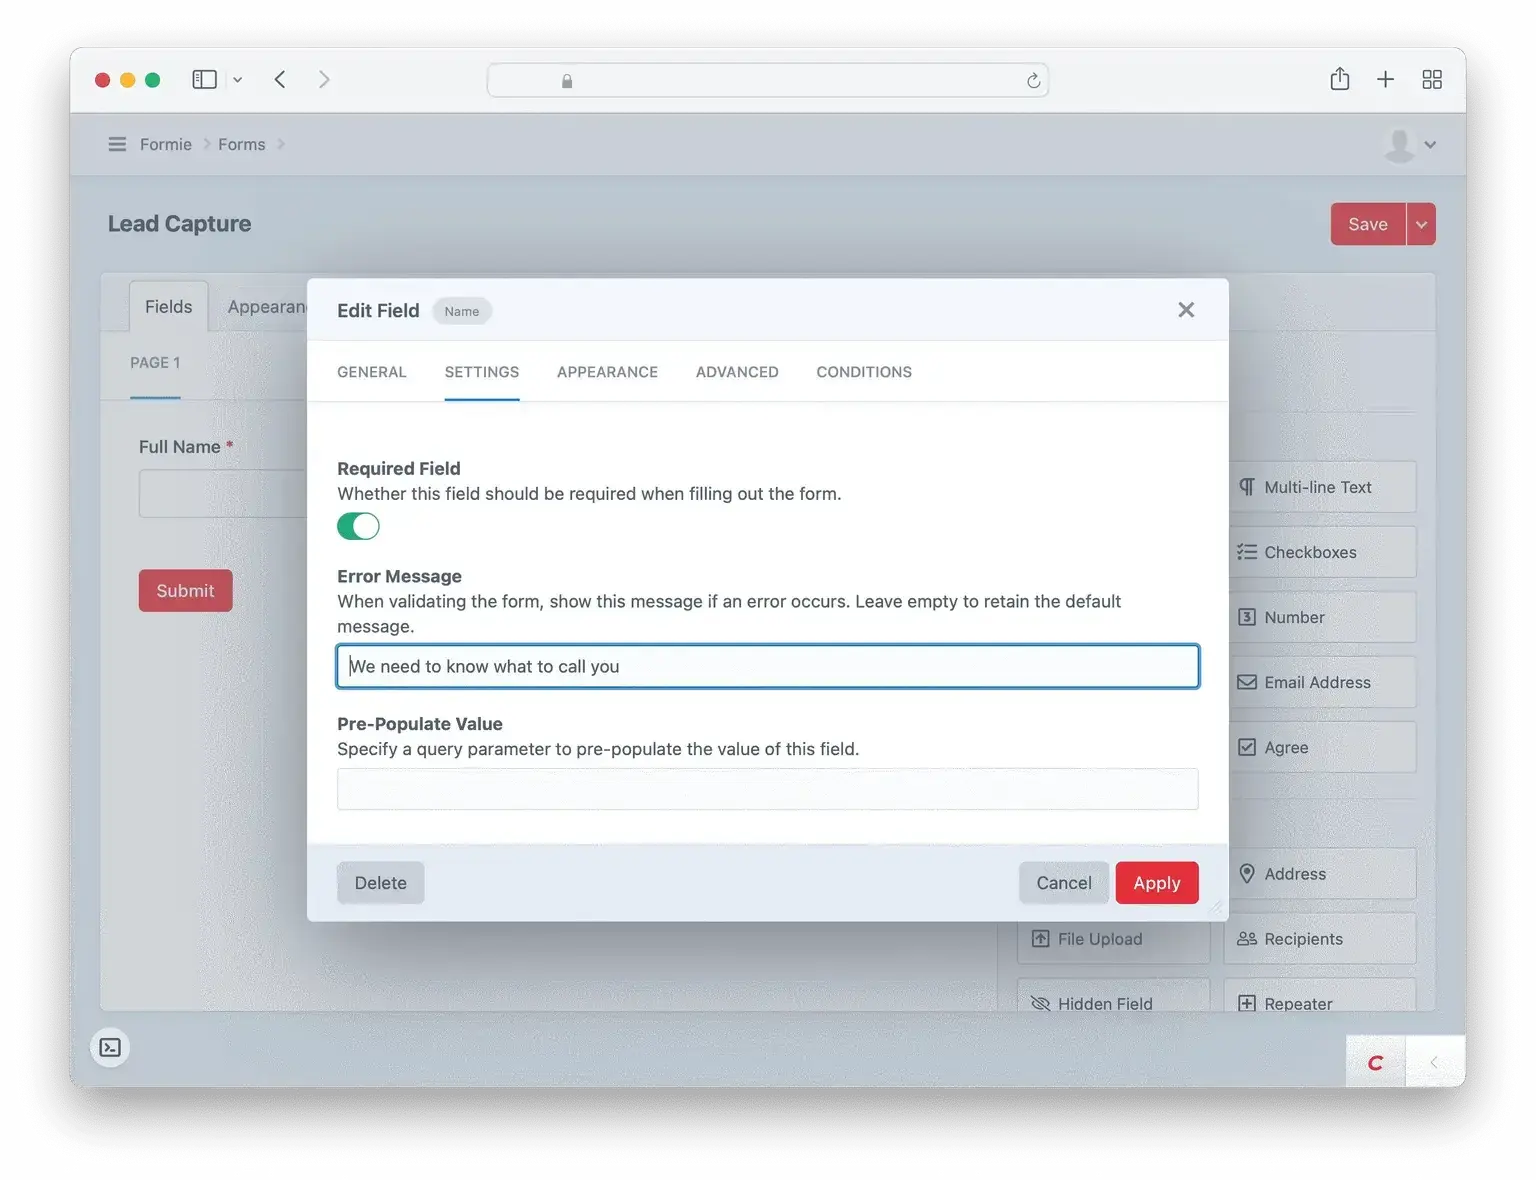
Once you drop the field into the form, a popup will appear with field options. All that’s required is a label, but most fields have other options, including making a field required. In the field options popup, click the Settings tab then switch on the Required field toggle. Click Apply to save changes to the field.
Field options can be very simple as above, but can also get complex. E.g. in the Conditions tab, you can set up logic to determine if/when this field should be shown.
If you need to access the field options popup again, hover over the field then click on the cog icon → Edit.
Repeat this process for all your fields. You can drag & drop fields within the form area on the left to rearrange them if needed. (For this example we’ve added fields for name, email address, and inquiry topic.)
3. Edit form appearance
Click on the Appearance tab. These fields are all self-explanatory, and we find you rarely need to make any changes here.
4. Configure form behavior
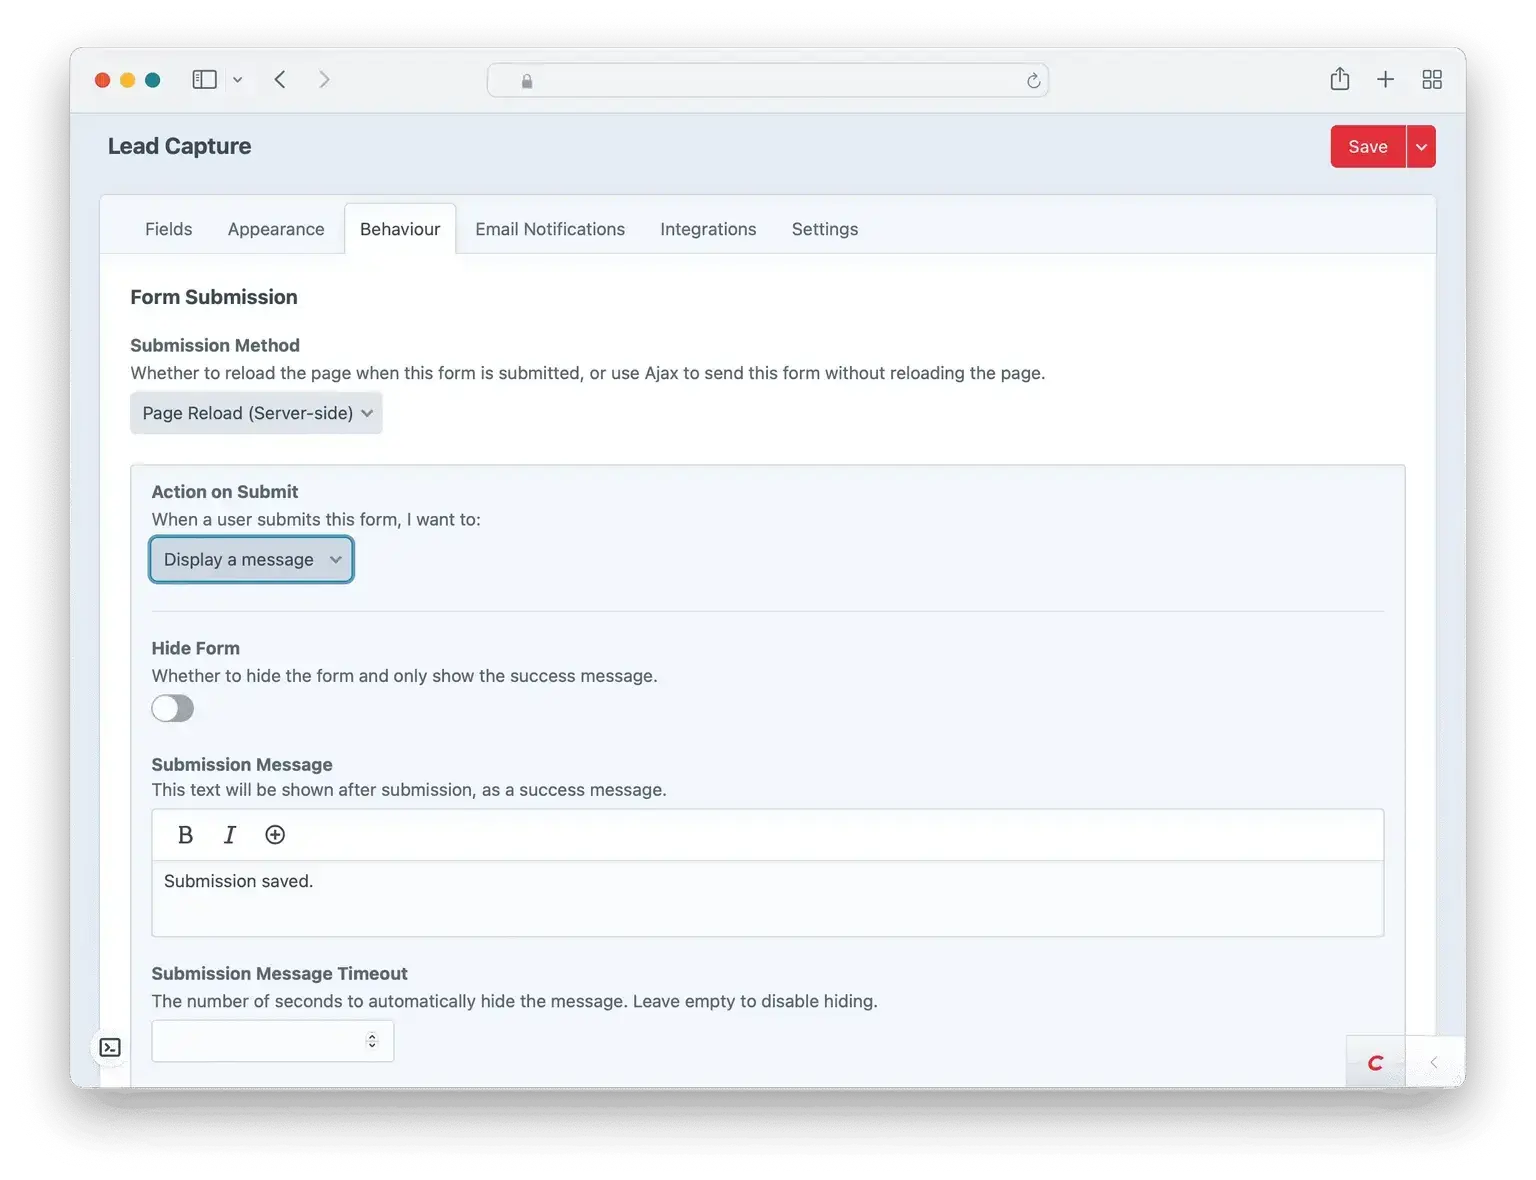
On the Behavior tab, you can control what happens when a user submits a form. This includes what happens on a successful submission – you can display a confirmation message, or redirect to another entry or URL. The latter can be very useful, e.g. you might create a “thank you” page that has additional information/calls to action (which you can also add to Google Analytics as a successful “conversion goal”).
You can also configure validation, including what error messages should say and where they should be displayed. Again, the defaults usually work well here – we definitely recommend keeping Validate Form on Submit enabled.
5. Set up email notifications
Let’s send a confirmation email to a user when they submit the form:
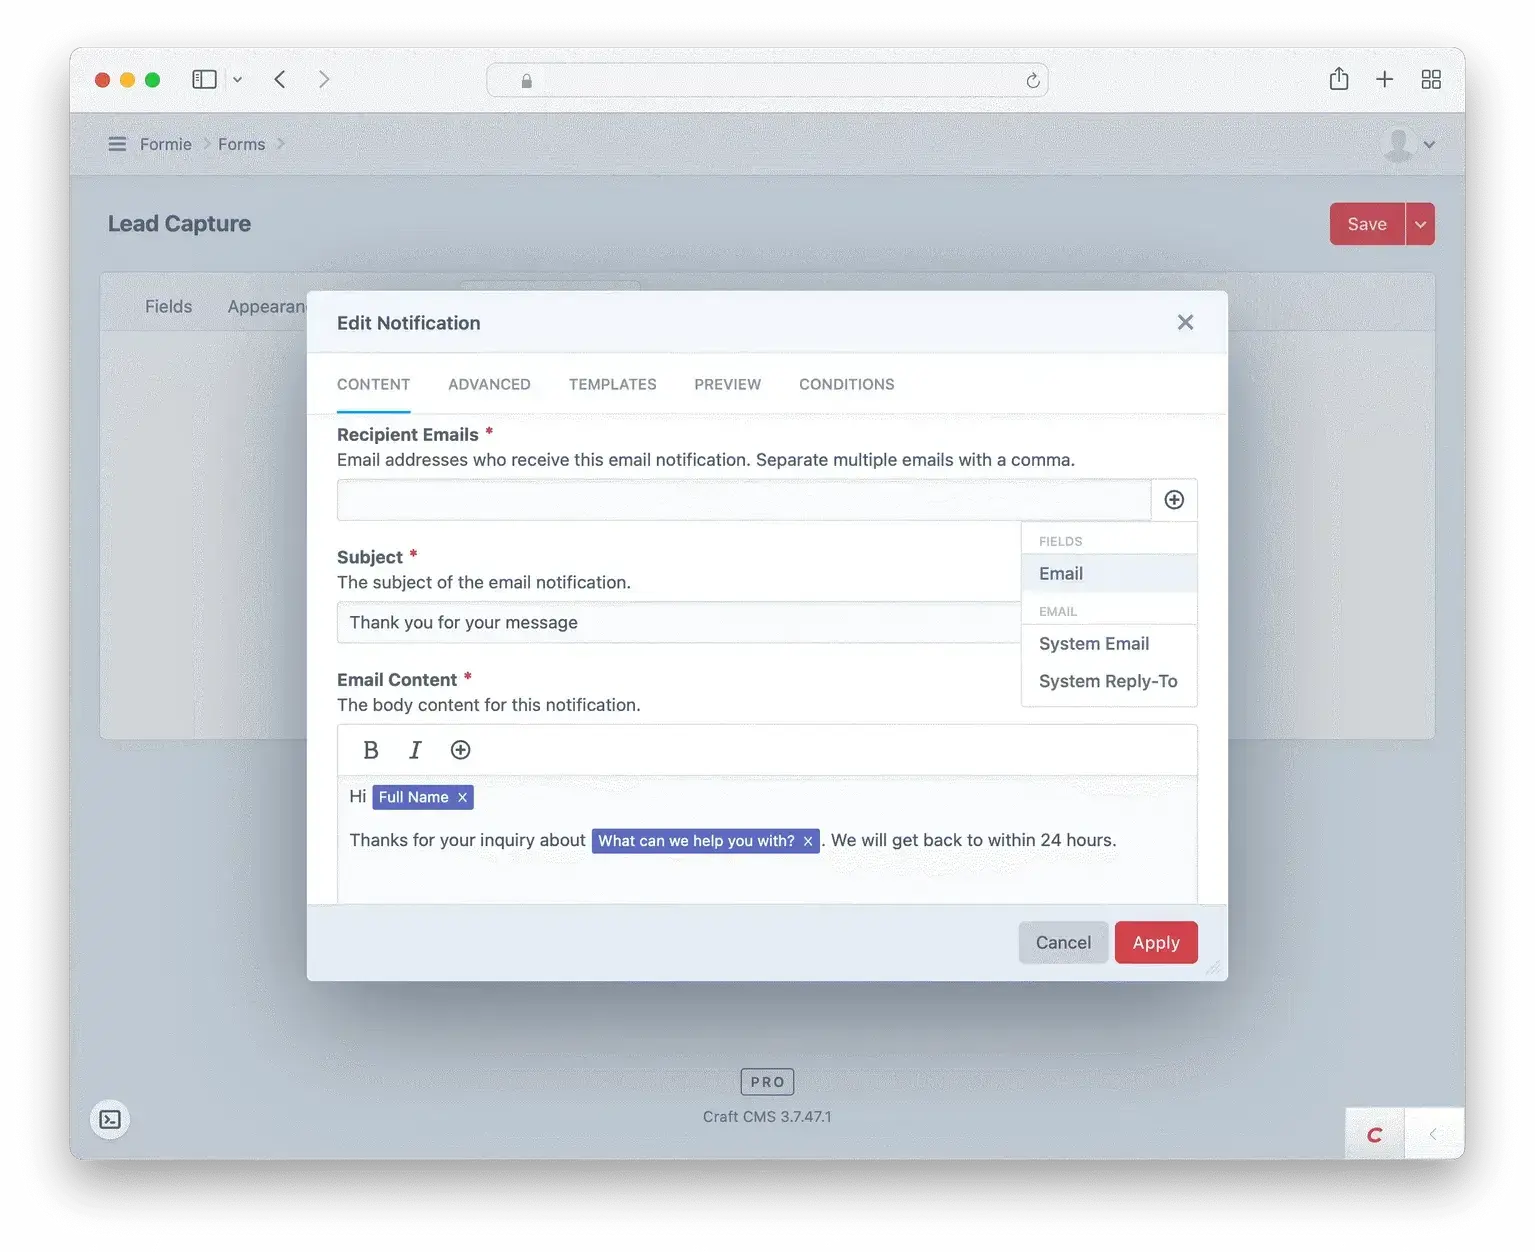
- In the
Email Notificationstab clickNew Notification. - Set
RecipientstoEmail Addresses. - In this case, we want to send the email to the email address of whoever submitted the form. Formie makes this easy with
variables. Click the plus icon in the right of the field. This lists all available fields from the form. ChooseEmailand you’ll see it appear in the field. - Enter the email content. We can use fields from the form submission by clicking the plus icon – in this case,
Full Nameis being used to personalize the email. - Click
Applyto save the email notification.
Let’s also send a notification to someone within our company. We’ll use a conditional to make sure the notification is sent to the right person, in this case, billing@website.com if the inquiry relates to billing:
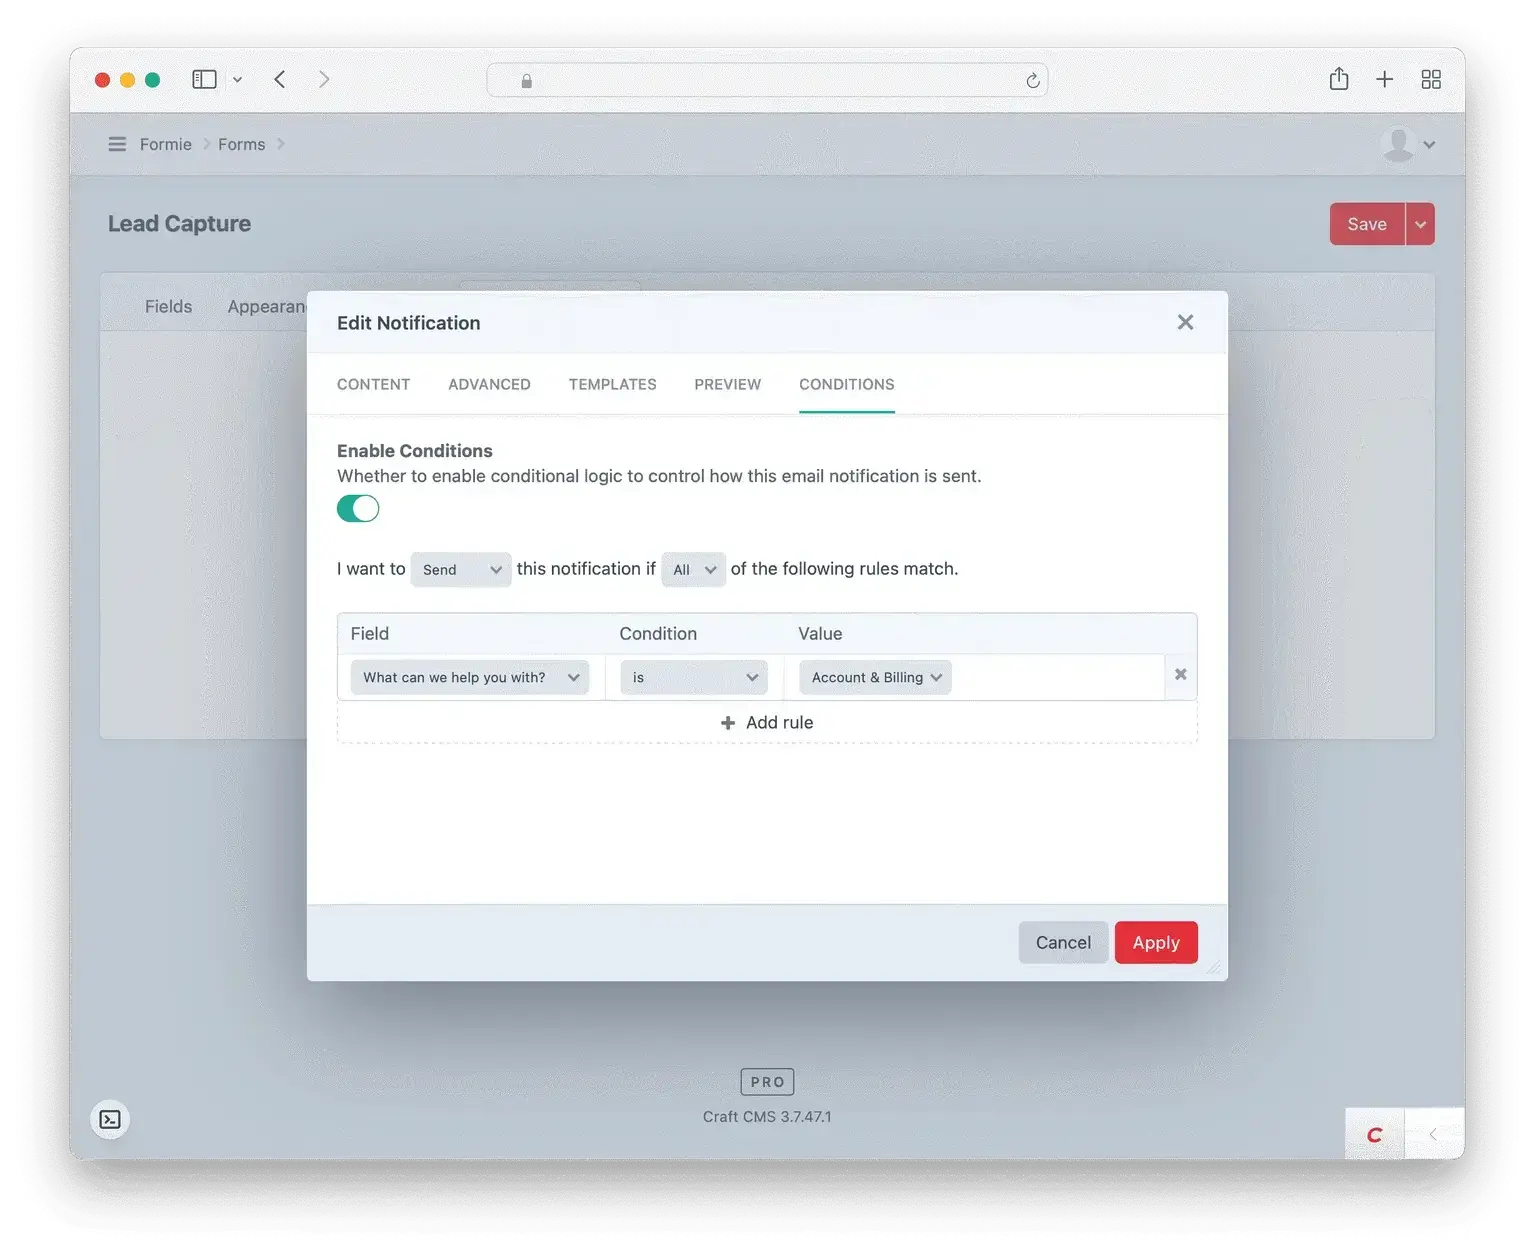
- Back in the
Email Notificationtab clickNew Notificationagain. - This time, we know the email we want to send, so we type
billing@website.comin theRecipient Emailsfield. - On the
Conditionstab set up a condition that says “I want to send this notification if the value of theWhat can we help you with?field isBilling” - Click
Applyto save.
You can click on either of these notifications to make further changes – Formie gives you a lot of power here, e.g. configuring who the email should be sent from, adding CC addresses, using custom branded email templates, and more.
Pro tip:to ensure email notifications get delivered and are not marked as spam, we highly recommend using a transactional email provider like Postmark, Elastic Email, or Sendgrid. For most use cases they’re free, and we can set this up for you.
6. Set up integrations
As above, Formie supports lots of integrations. Your web team will need to help you set up the integrations initially. Once this is done, you’ll see any available integrations listed in the Integrations tab and it’s easy for you to add them to your form. Just click on the integration name, turn on the Enabled toggle and fill out the relevant fields.
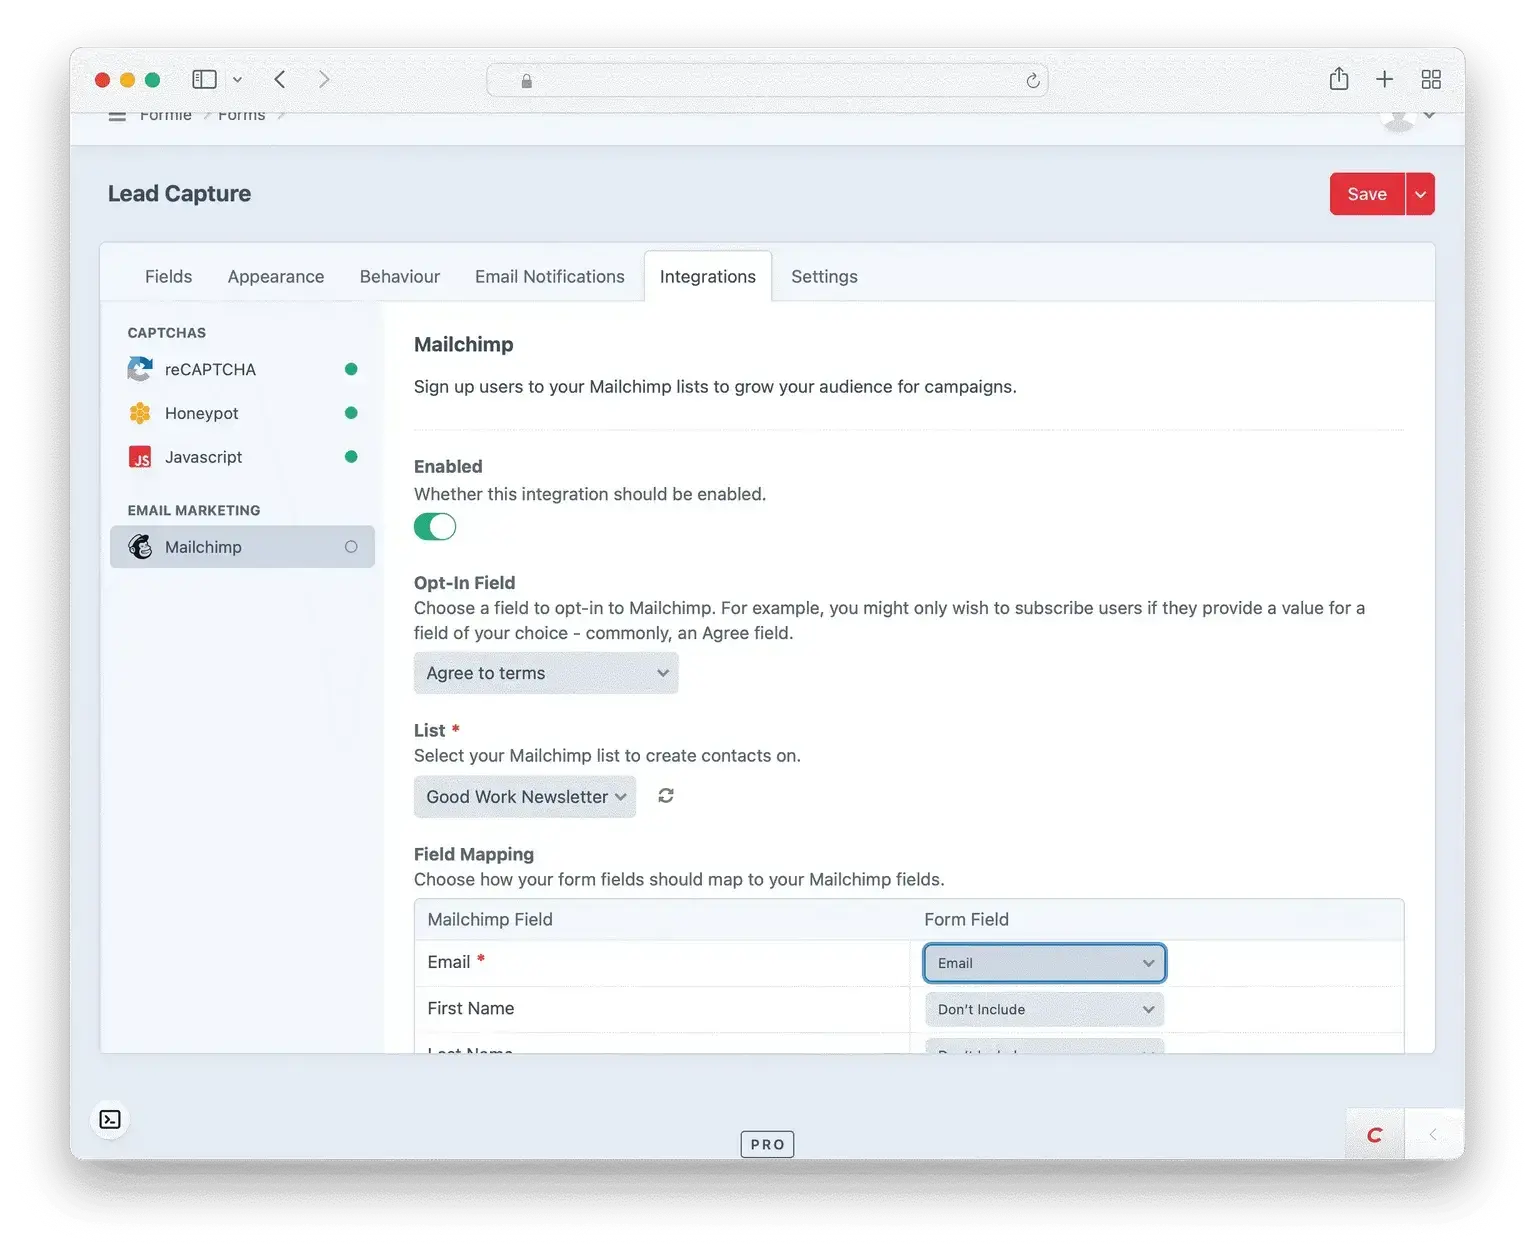
A common use case is adding users who submit a form to a Mailchimp list. Here we’ve selected which list to add them to and mapped which Mailchimp fields (on the left) should receive the data from which form fields (on the right).
7. Prevent spam
If you don’t have spam protection set up, you will get spam submissions that can clog up your inbox and make it hard to find legitimate submissions.
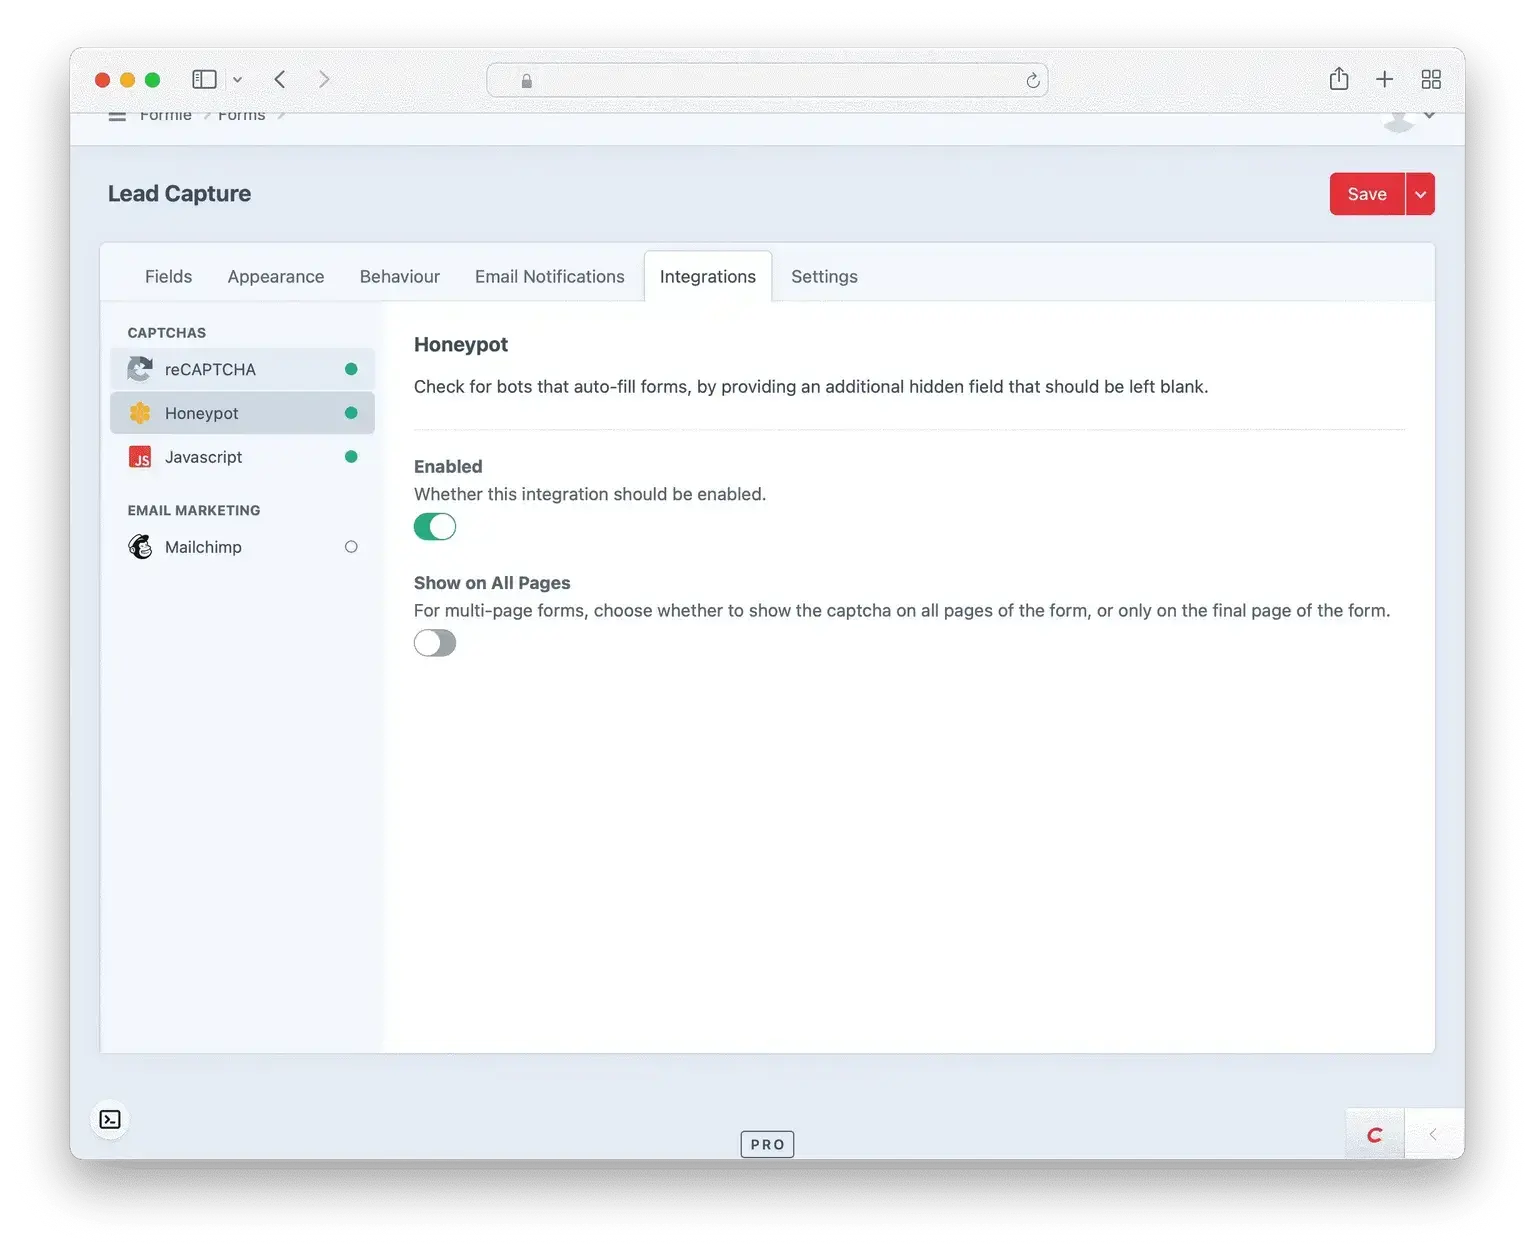
In the Integrations tab, you will see a “Captchas” heading. Any integrations available to you are listed here.* To enable one, just click on it and switch the Enabled light switch on.
*Note: Your web team will need to initially configure spam protection for you. Basic solutions like Honeypot and Javascript only take a few minutes to set up. More complex solutions like Google’s reCAPTCHA take a little more work but are more robust.
8. Last few settings
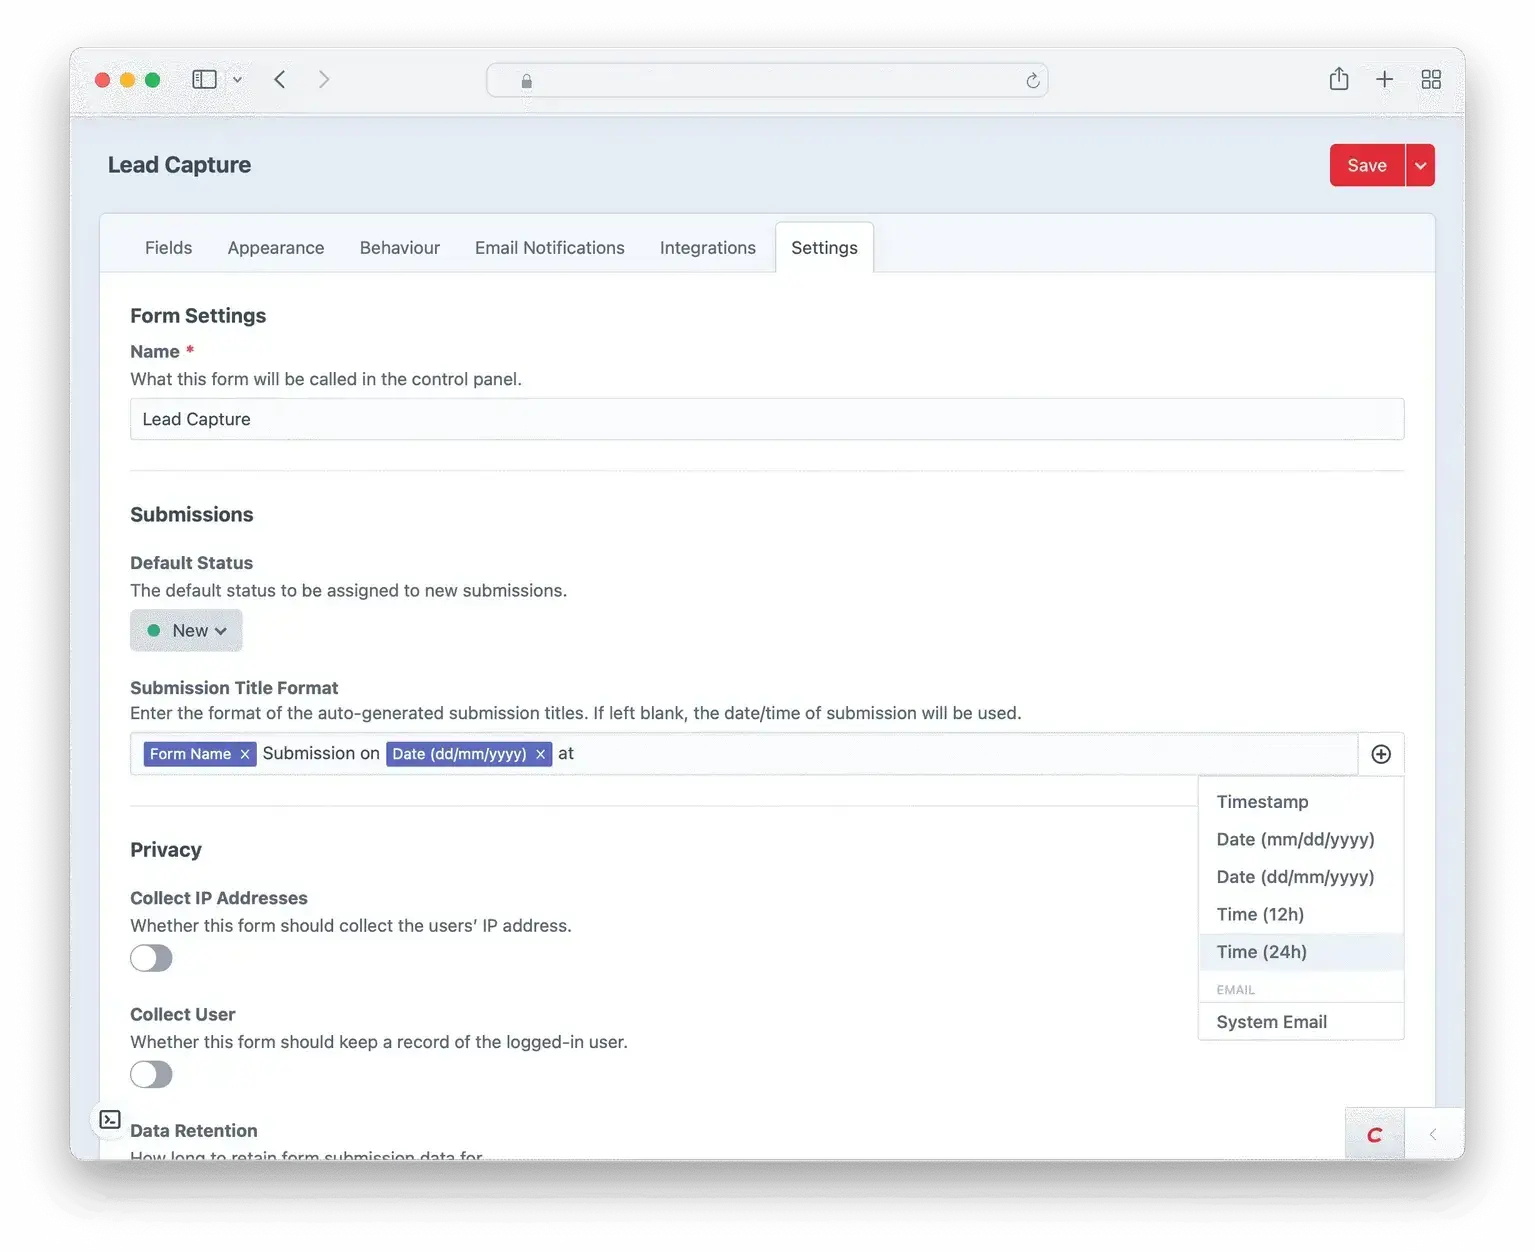
In the Settings tab, it’s good to change the Submission Title Format to something more readable than the default “Timestamp.” Again Formie lets you add variables such as the form title and submission date to make this easy.
9. Save and publish the form
Now you’ve finished setting up your form, click Save in the top right.
The final step is to actually display the form somewhere. Forms can appear anywhere, e.g. you might have a Global set up for your site footer which could contain a newsletter signup form.
Let’s assume that you want to add a contact form to your contact page. Open up the contact form entry. Your web team should have set up a Form field. Click on this and select the form you just created. Save the entry. Done!*
*Pro tip: It’s wise to save the entry as a draft first, preview it, and fill out the form to check it’s working as expected, including sending notifications.
Further reading
-

Deadlinks Plugin for Craft 5
By Gavin Platt, 13 Apr 2026
-

Two spooky Craft quirks that could be lurking on your site
 By Michael McBride, 14 Oct 2025
-

Key takeaways when upgrading to Craft 5
-

3 simple ways to boost your Craft CMS security
 By Ant Cooper, 11 Aug 2025
-

Pwny plugin for Craft 5
By Ant Cooper, 02 Dec 2024
-

Craft 5 Released
 By Chris Rowe, 01 Apr 2024
-

Block Usage plugin for Craft CMS
By Chris Rowe, 13 Mar 2023
-

Nag plugin for Craft CMS
By Ant Cooper, 23 Feb 2023